 |
|
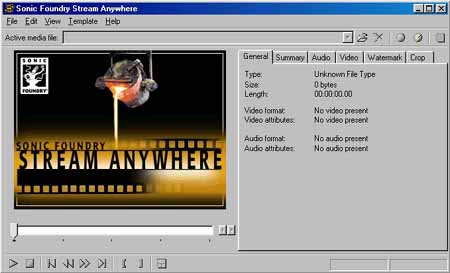
- First thing you need to do is open Sonic Foudry Stream Anywhere (hereafter referred to as SF). Once it is open and read for action, you should see the above screen. (Please note that all screenshots have been made smaller for convenience.) |
|
A Beginners Guide to using Sonic Foundry's Stream Anywhere! This tutorial is intended for complete beginners at .ASF making. If you are an experienced user, I would recommend you download Windows Media Tools and Adobe Premiere (5 or later). If you have a .MPEG file that you want to make into an .ASF file and don't wanna mess with a bunch of settings, then this is for you. Simply ignore all the other options in the software, and just follow the steps layed out below, and you will have an .ASF of your .MPEG in a matter of hours. In this example, we will convert a .MPEG (565MEG) to 102MEG .ASF.
|
| What you will
need:
- Sonic Foundry - Stream Anywhere Softwhere (V1.0a used in this example) Download it HERE. - An input file of your choice. A large .MPEG will be ideal. (As used in this example.) - Enough free hard drive space to store your completed .ASF. (I recommend at LEAST an equal portion of drive space free as the input file. Ie, if you have a 500meg .MPEG file you want to convert to .ASF, make sure you have at least 500meg of hard drive space free BEFORE you begin anything!
|
Step 1: Download and install the software. Make sure you register your software... :) (You may need to visit here.)
|
|
- First thing you need to do is open Sonic Foudry Stream Anywhere (hereafter referred to as SF). Once it is open and read for action, you should see the above screen. (Please note that all screenshots have been made smaller for convenience.) |
Step 2: Choose your input file. This is the file you want to send up as an .ASF after all this.
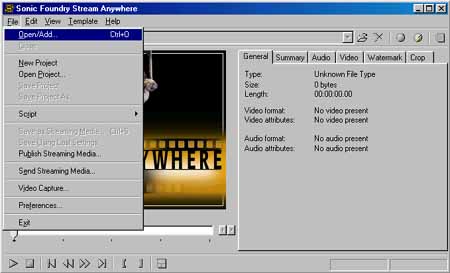 |
| - Click on "FILE / OPEN/ADD" and select the file you want to convert to an .ASF file. In this example we are converting the MPEG file of the movie: "Scream 3" There are 2 parts, the file we are doing first is called "Aaah1.mpg". |
Step 3: Fill in the summary details. This will make it easier to identify this file later.
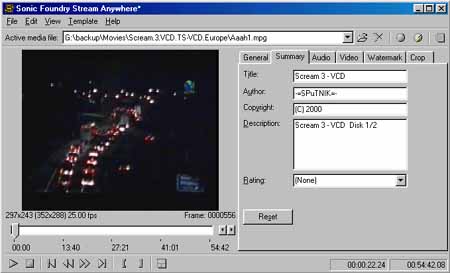 |
| - Next, click on the "SUMMARY" tab on the window on the right and fill in all the details of the file you would like to be displayed in the player once the file has been encoded. I STRONGLY advise that you use this to label your .ASF's, it makes it very convenient later on to determine what is what. If you're familiar with .MP3, then think of this as ID3 Tag's for your .ASF. |
Step 4: Specify the output format. This is where you can set the options that wil determine the the size/quality of your output .ASF file.
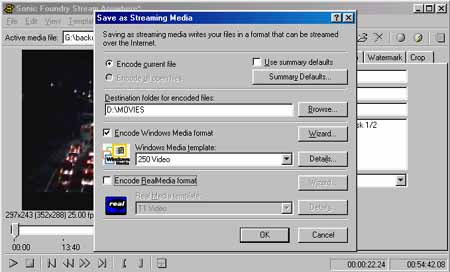 |
| - Now click on
"FILE / SAVE AS STREAMING MEDIA..." This will now
open a new window that will prompt you for more details on the output
file. (See picture.)
- Specify the destination folder for the completed .ASF (D:\MOVIES in this case). Make sure that you have "Encode WIndows Media Format" ticked here and not RealMedia. - "Windows Media Template" is by far the most IMPORTANT setting here, so I will examine it closer in the next step, but to start with, I recommend you select "250 Video". This will give good results overall. |
Step 5: Fine tune your output specifications. You can modify the options until you get the quality and size you are looking for.
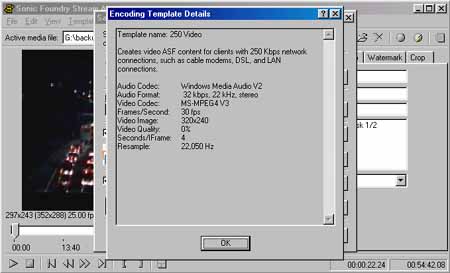 |
| - Let's take a closer
look at the "Windows Media Template" option:
- This is where you can set the output quality of your .ASF based on numerous things. Clicking on "DETAILS" will give you a full summary of the selected template. (See image above) If you are unsure, you can click on the "WIZARD" that will help you through the best settings. - NOTE: This setting requires that you know a little about your input format and what you expect from your finished .ASF file. As a general rule, just remeber that "Better quality equals larger output files." So it's basically up to you to find the best tradeoff setting between acceptable quality and acceptable file size that suits your needs. The "250 Video" we have selected here will turn a 600MB .MPEG into approximately a 150MB .ASF file. (Approximates only!) |
Step 6: Start the encoding process. Warning: This could be very time consuming...
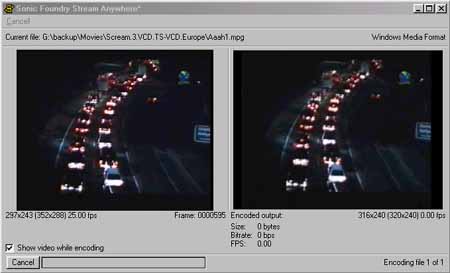 |
| - Now just click on
"OK" and let the encoding begin...!
- If you have the "SHOW VIDEO WHILE ENCODING" ticked, you can watch the encoding in realtime. The left window shows your original .MPEG and the window on the right shows the .ASF version. This is a good way to judge the quality of the final output. The progress bar at the bottom on the screen will show you how far you are. (Just to the right of the "CANCEL" buttom. - Depending on the speed of your computer, encoding can take anything from 20 or more hours!! (Pentuim 1 based systems) to 2 hours (Pentium 3 Systems). So be prepared to wait if you have a slow PC. |
Final Gates: Now you can sit back and relax while your computer does some work for a change. A few useful tips here:
- Do NOT multitask while you are busy encoding. You will get bad frames in your final .ASF file. Rather set this all up just before you are about to go to sleep, and leave the PC to run on it's own overnight.
- Expect that the quality of the finished .ASF file will NOT be as good as the original. ASF'ing is not like MP3 in the way that the end result is an almost identical replication of the original. ASF'ing REDUCES image and sound quality. The extent of which is determined by the settings you choose at the time. However at ratio's of approximately 6:1, the output files are still so close to the original that the difference is hardly noticeable, making .ASF a very cool format for storing video footage.
- Only when the last tree has been felled, the last fish caught, the last river poisoned, will you know that man can not eat money...
ENJOY! Any questions, email me.
CopyLeft (C) 2000 SPUTNIK All righrts reserved.