 |
|
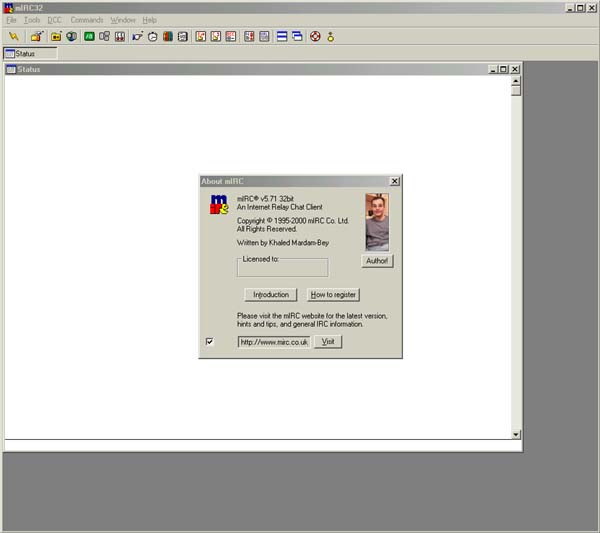
- When you install, just choose all the DEFAULT settings, don't fuck with anything. - Now, load up MIRC32.EXE, and you'll the the screen above. |
|
A Beginners Guide to using MiRC to download (metal) .MP3's. WARNING: This tutorial contains 19 screen captures (a total of 1.2MB), be patient! I don't really know much about IRC at all, but I have managed to piece together enough information to hunt and caputure .mp3's using MIRC. (Thanks to piercedspirit for tips.) It's quite a simple process actually, but the concept is much easier to grasp if you can ignore all the irellevant crap, and concentrate only on what's needed to pull the files. (After all, that's all we really want to do. We don't wanna chat to other pratts about crap, we want FILES! :) In this example, we will use MiRC to download a song from the IRC Channel #mp3_metal on the Dalnet Network. (Further notes at the bottom of this page.)
|
| What you will
need:
- A copy of MiRC (5.71 used in this example) [This can be found HERE.] - A lot of patience, as this is primarily a WAITING GAME!
|
Step 1: Download and install the software.
|
|
- When you install, just choose all the DEFAULT settings, don't fuck with anything. - Now, load up MIRC32.EXE, and you'll the the screen above. |
Step 2: Insert your details.
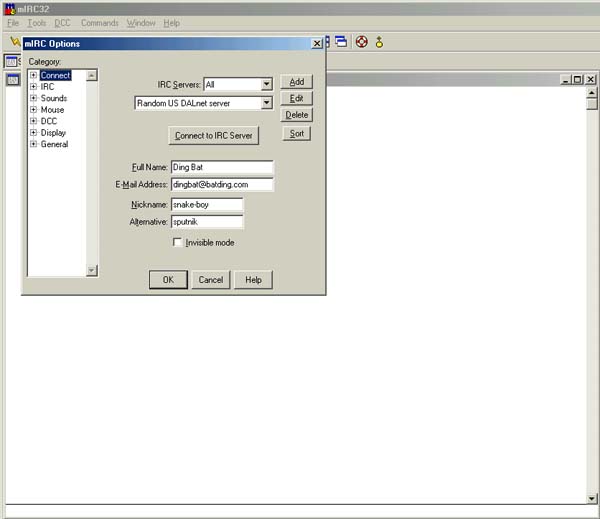 |
| - This window should
pop up, prompting you for your information.
- Choose a "Random US DALnet Server", Insert your Name, Email and Nicknames (Nick's). - Note: Your Alternative nickname will only be used if there's already someone in the channel using your first choice. - Click "OK" :) |
Step 3: Configuring MIRC in two steps. (Step a)
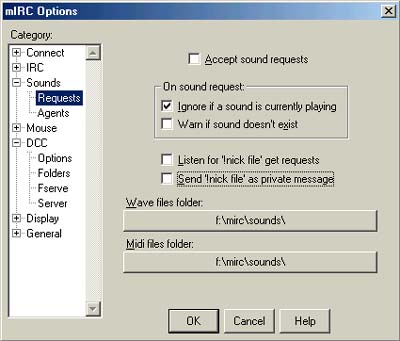 |
| - Click on "FILE"
and select "OPTIONS"
- By default "Send "!nick file" as private message will be ticked, you need to *UNTICK* this. See above! |
Step 4: Configuring MIRC in 2 steps. (Step b)
 |
| - Now you need to make
sure that MIRC will allow you to receive the incoming .mp3 file.
- Just add a comma, then *.mp3 to the list of accepted file types. You don't need to change ANYTHING else in the configuration! |
Step 5: Connecting to the DALnet Network, finding a server.
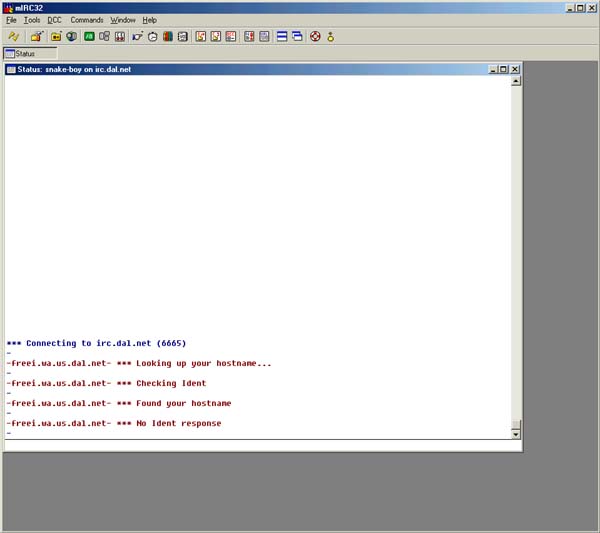 |
| - When you click on
the little "lightning" icon |
Step 6: Connected to a server, now choose a channel.
 |
| - Eventually, you'll
connect, and a window will popup asking you what channel you want to
join. Don't bother scrolling, just type in "#mp3_metal" (see
above).
- Later you can feel free to try other channels out, but sofar I have found this to be the BEST one there is! :) |
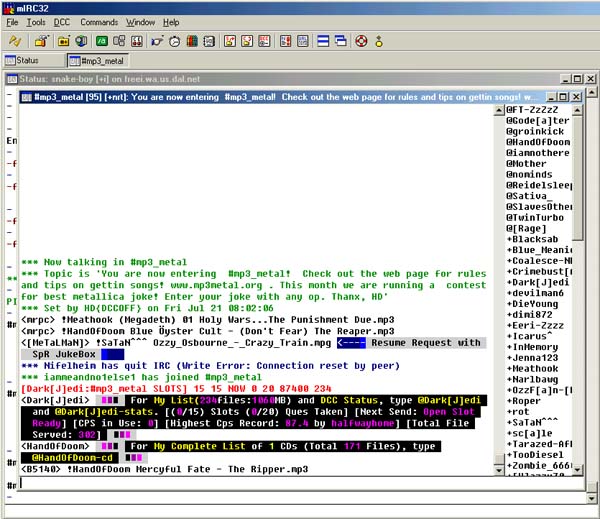
Step 7 Welcome to the channel!
|
|
|
- Cool,... you're now in the channel, and don't worry about all that crap onscreen scrolling past faster than you can read it. Reading all this is optional! :) This will continue to scroll indefinately... - The column on the right shows a list of all the people's nick's that are currently in the channel. The "@" symbol tells you that this person has a list of songs (mp3's) available to download. The "+" tells you that this person has "ops" status. ie, do *NOT* attempt to message them, and don't piss them off or you'll get kicked, or banned from the channel. |
Step 8 Getting someone's list of MP3's.
|
|
|
- To get someone's list, just type in the users name with the "@" symbol. (See above.) - Press enter! :) Your request for the list goes off, now begins the wait! It could take anything from 5 seconds to 5 minutes! |
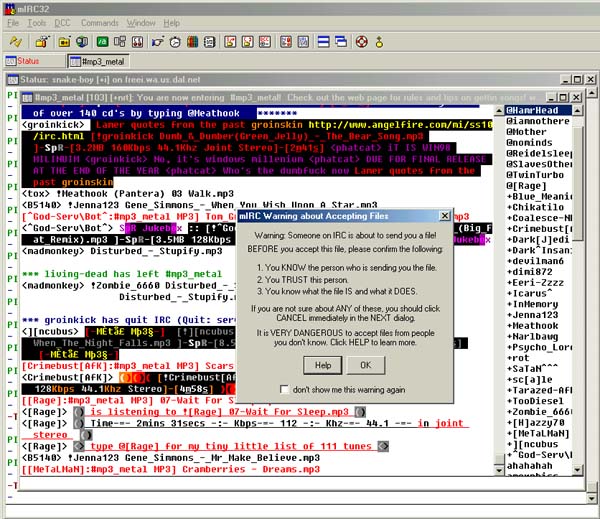
Step 9 Accepting the list.
|
|
|
- Eventually your request will be answered. MIRC will pop up this stupid warning screen, click on "OK". Probably be a good idea to tick "don't show me this again" |
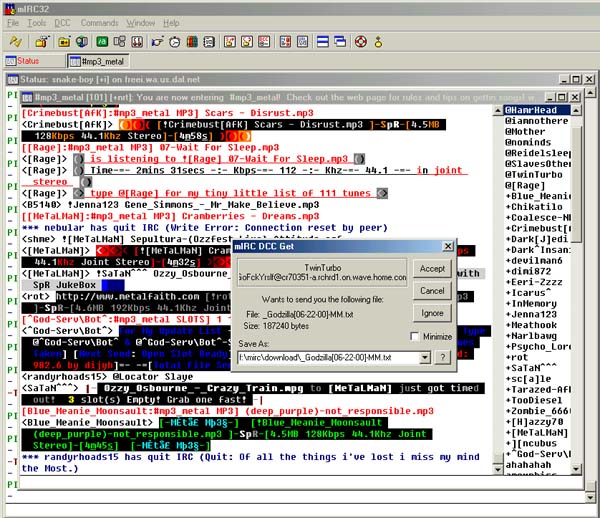
Step 10 The actual list please!
|
|
|
- At last you're prompted where to save the list. The list is in text format. Save to it's default location, at least you'll be able to find it easily enough. - Click on "Accept" and let it download. |
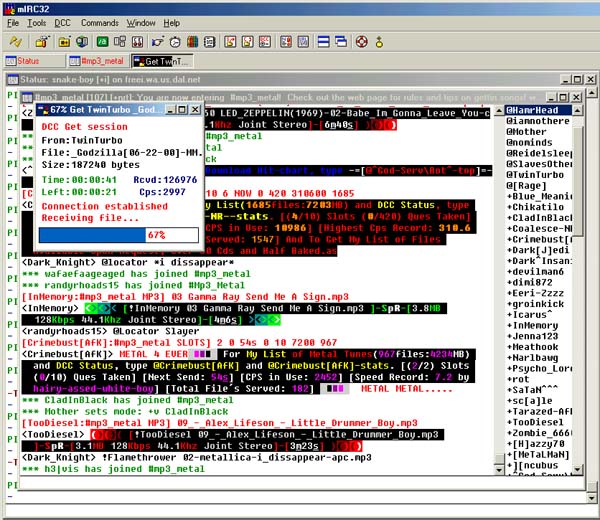
Step 11 Incoming!
|
|
|
- The file will download. When it's done, you can close this little window. |
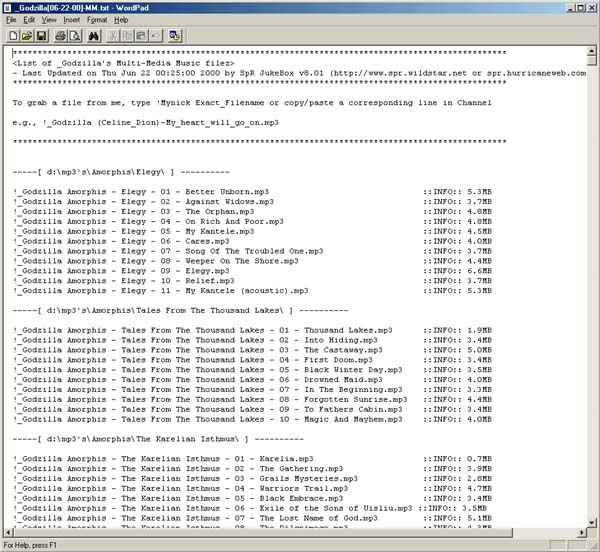
Step 12 Check out the list! :)
|
|
|
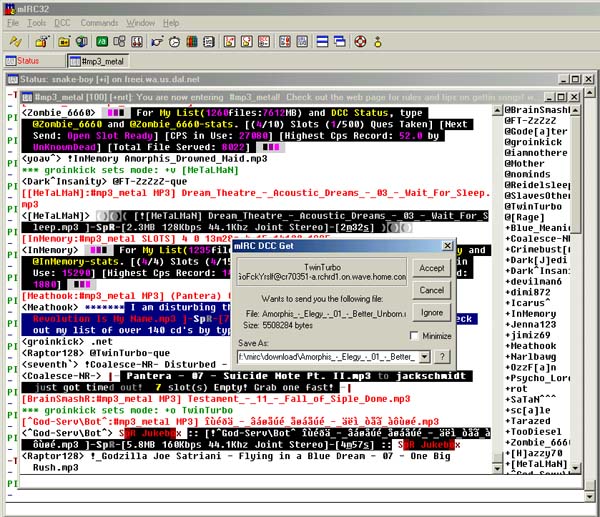
- Read through the list you just downloaded. Look for the stuff you want. - For the sake of this example, I'll download the FIRST song from this list! - You must cut and paste this directly into the channel. Take everything except the "::INFO:: 5.3MB" part. (See next image) |
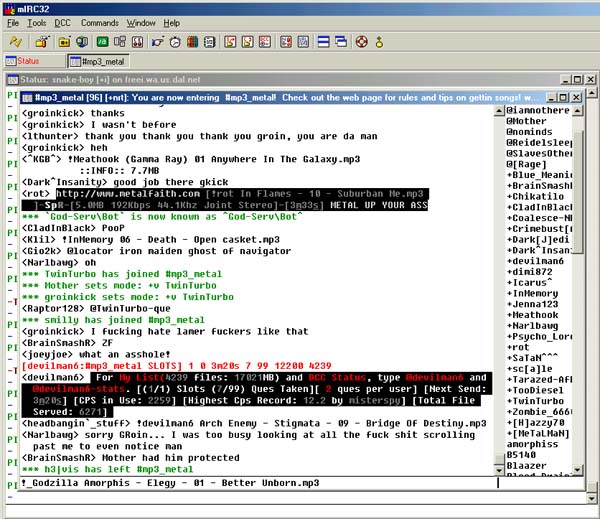
Step 13 Cut and paste your selection from the list.
|
|
|
- Paste the track you want into the channel, press ENTER! - Now the REAL waiting begins... You will now go into the queue. Some users allow you to have 2 files in the queue at a time. (Some possibly more), But remember that this person is serving many files all the time, so in order to maintain a reasonable speed for each transfer, the number of simultaneous downloads must be restricted. - The channel will eventuallu acknowledge your request and give you the status of the queue. (See following image.) |
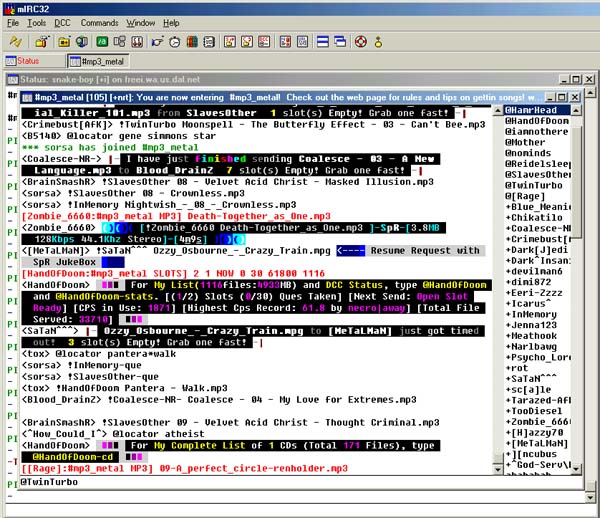
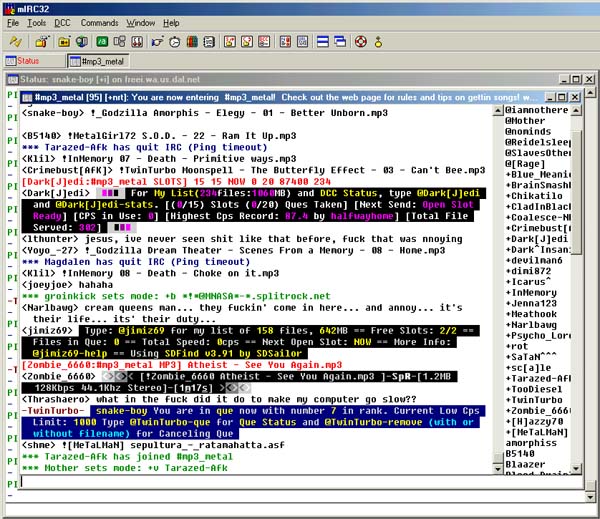
Step 14 Where are you in the queue?
|
|
|
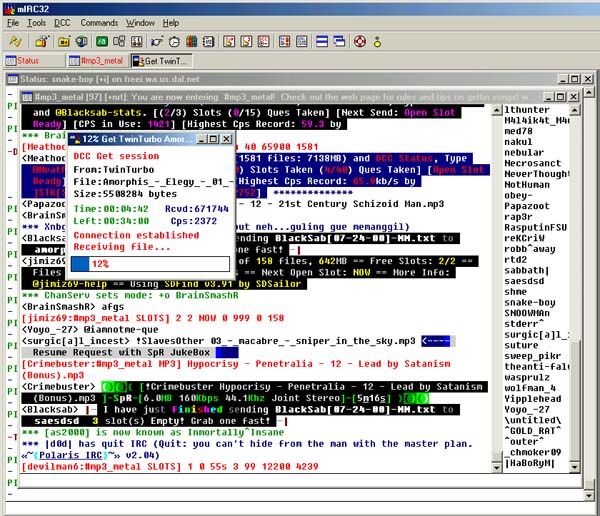
- Notice the coloured text addressed to me (snake-boy), well this means that I am 7t in the queue and the cps limit is 1000. In other words if your transfer speed drops below 1000cps, your transfer will be aborted. - Futher info tells us that if you type: "@TwinTurbo-que", the status of the queue gets requested again, so you can see where you are in the queue. You can also REMOVE yourself fromt he queue by typing: "@TwinTurbo-remove". - Now you wait and wait and wait ;) Depending on how busy the user is you're downloading from, you could wait a while. Keep checking the queue's progress by typing "@TwinTurbo-que"... (See following images) |
Step 15 Tracking your progress in the queue...
|
|
|
- After queries in the channel ("@TwinTurbo-que"), keep an eye out for the responses. They may not appear immediatly so once again, be patient.! - Your responses should look something like these... (Above) |
Step 16 Accept the file.
|
|
|
- When your turn in the queue eventually arrives, you will be prompted where to save the incoming .MP3 somewhere. The default works fine for me. |
Step 16 Download and add to your collection! :)
|
|
|
- Finally download the file to completion, and rejoyce at having successfully completed downloading through MiRC. - Now that you have this mastered, you can start fiddling with other things that catch your attention in the channel... (See footnotes for final tips) |
Footnotes:
- If you see something scroll past in the channel that you want, just select it, and paste it again for yoursef to receive it too.
- As I have mentioned before, this is a waiting game. Certain times of the day (or night) yield shorter queues (sometimes no queues at all), so experiment for better results.
- Beware of messages that pop up, telling you to "join this or that channel" best to just close and ignore them.
- Useful Tips:
- Wouldn't it be cool to be able "search" for something in all the users lists? Well, you can! Just type: @locator <whatever-you-wanna-seach-for>, ie @locator horrorscope. This will cause windows of users to popup that have matching files. You can cut and paste direct from here or investigate further on your own...
- It is VERY easy to get your username(s) and/or IP address(s) banned from the channel. This is a METAL channel, and requesting shit like KORN and LIMP BISCUIT will get you Auto-Banned from the channel (Excellent!) . Messaging the ops can cause problems also, so make sure you know what you are doing! (Read the next and final tip.)
- I strongly STRONGLY recommend you read the rules of the channel.
It's just a poor man's crusade...
ENJOY! Any questions, email me.
CopyLeft (C) 2000 SPUTNIK All righrts reserved.